
Tip of the Month
April 2015
Converting a Raw Image to Black and White
In my effort to come into the 21st century, I've started uploading some images to Facebook, and several people emailed me asking how I made the shot. It was actually easy, and the screen shots that follow will show the steps.
I used Photoshop 6's RAW converter, but Lightroom would have worked exactly the same, although the tabs would look differently than what I've illustrated here. We'll be teaching how to use Photoshop's RAW converter in our Digital Complete Nature Photo Course, and how to use Lightroom in our Arizona Hummingbird and Nocturnal Wildlife Tour.
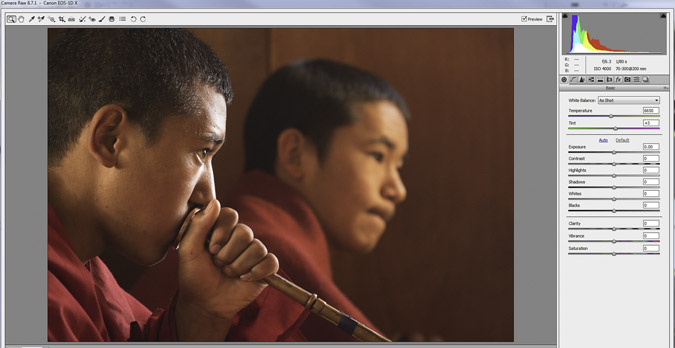
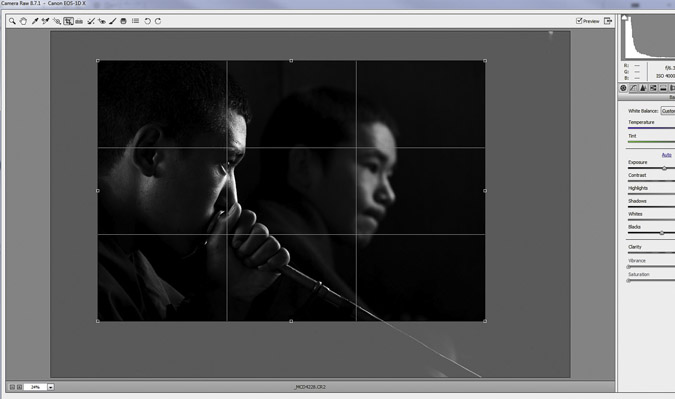
This was the
original RAW capture. You'll note that I haven't moved any of the sliders, but the exposure is perfect (manual mode, spot metering - DCNPC).
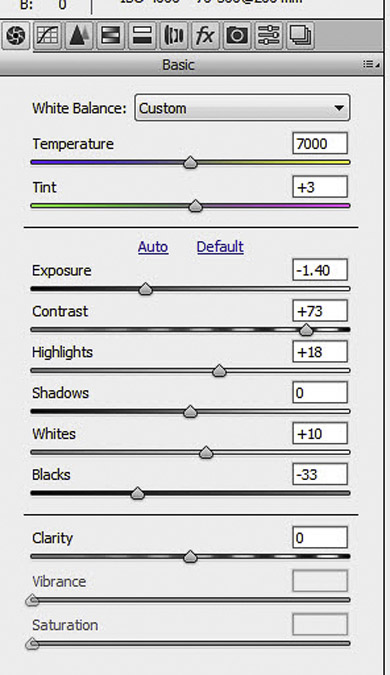 Here's the Basic Tab, and the adjustments I made. I felt that contrast, a very high key effect, would make this image stand out. Accordingly, I reduced the exposure by a -1.4 setting, and increased the contrast to +73. Since the bright areas would draw your eye, I increased the brightness of the highlights by +18, and I increased the amount of black, to -33.
 Next, I went to the HSL tab, the fourth icon from the left above the Basic tab.
I'm not concerned with the HSL (Hue, Saturation, or Lightness) until I click on the Convert to Grayscale prompt.
When I do that, a new palette appears, the Grayscale Mix.
Now it is just a matter of moving the sliders, and liking what you have done. There really was no set plan here, except to pull down the Red slider to darken red even further. As I moved the sliders, areas got brighter or darker, and when I liked the result, I stopped! Not very scientific but the effect you (or me) are after is what appeals to you visually. Here's the Grayscale Mix:

The last step in the process was simply cropping the image to taste. In the screen shot, you can see the amount of image that was cropped out -- maybe a third of the total area.rther back.
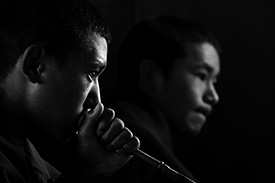
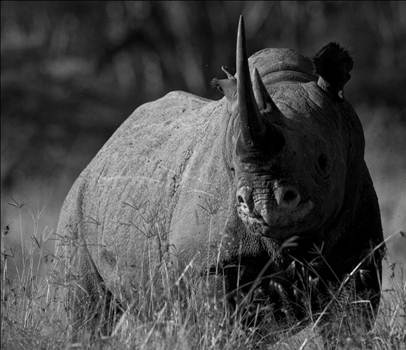
The finished result:
We teach the RAW converter, applicable for Lightroom or Adobe's ACR, and mastering the RAW converter can make a huge difference in your images.


Previous Tips, July 2009 onward
Using Extension Tubes with a Zoom Lens
Nature Photography Magazine
Photographing Lightning
Bataflae Photo Backpack
The Guide to Tropical Nature Photography
Essential Gear for Safaris
Take our Digital Nature Photo Course FIRST!
GPS and Home Security
Range IR Camera Remote
Gitzo Monopod 5561T Monopod
Easy Macro with Extension Tubes and Zoom Lenses
FotoSharp Camou Rain Covers
Canon 17mm T/S Lens
Locking Button for the Canon 7D
NIK HDR Program
Silver Efex Pro for Black and White Images
Beware the DELL Software Solution Rip Off
How and What We Pack for Trips
Canon Digital Learning Center
The Movie Mode with the Canon Mark IV
Batch Renaming in Bridge and CS5
Alternate Uses of some Bogen Products
Hoodman Products
Using High ISO and Live View for Focusing in Dim Light
Art Print Scams for Hungry Photographers
Hungry Vultures ruin vehicles in the Everglades
Use a Short Lens for Depth of Field
Get Professional Help!
Mini-Molar Bag
Access America Trip Insurance
Bogen Base for Macro Work
Archived Tips of the Month
prior to July 2009
Most of my original Tips of the Month for the last several
years are available through this link. Warning - some of the links are broken, so some are not available at this time. Also, the 'look' is from my
original web site, although if I ever have enough time I might redo these pages to match the new web site But that's not a high priority.
Check out our latest website,
mcdonaldwildlifephotos.com
where we'll be adding portfolios and eventually building up
a searchable data base for photo buyers. We've just started,
and the selection is limited, but it is still worth a visit!
Office Phone: (717) 543-6423
Or FAX us at: (717) 543-5342
Tip of the Month
April 2015
Converting a Raw Image to Black and White
In my effort to come into the 21st century, I've started uploading some images to Facebook, and several people emailed me asking how I made the shot. It was actually easy, and the screen shots that follow will show the steps.
I used Photoshop 6's RAW converter, but Lightroom would have worked exactly the same, although the tabs would look differently than what I've illustrated here. We'll be teaching how to use Photoshop's RAW converter in our Digital Complete Nature Photo Course, and how to use Lightroom in our Arizona Hummingbird and Nocturnal Wildlife Tour.
This was the
original RAW capture. You'll note that I haven't moved any of the sliders, but the exposure is perfect (manual mode, spot metering - DCNPC).
Here's the Basic Tab, and the adjustments I made. I felt that contrast, a very high key effect, would make this image stand out. Accordingly, I reduced the exposure by a -1.4 setting, and increased the contrast to +73. Since the bright areas would draw your eye, I increased the brightness of the highlights by +18, and I increased the amount of black, to -33.
Next, I went to the HSL tab, the fourth icon from the left above the Basic tab.
I'm not concerned with the HSL (Hue, Saturation, or Lightness) until I click on the Convert to Grayscale prompt.
When I do that, a new palette appears, the Grayscale Mix.
Now it is just a matter of moving the sliders, and liking what you have done. There really was no set plan here, except to pull down the Red slider to darken red even further. As I moved the sliders, areas got brighter or darker, and when I liked the result, I stopped! Not very scientific but the effect you (or me) are after is what appeals to you visually. Here's the Grayscale Mix:
The last step in the process was simply cropping the image to taste. In the screen shot, you can see the amount of image that was cropped out -- maybe a third of the total area.rther back.
The finished result:
We teach the RAW converter, applicable for Lightroom or Adobe's ACR, and mastering the RAW converter can make a huge difference in your images.
Previous Tips, July 2009 onward
Using Extension Tubes with a Zoom Lens
Nature Photography Magazine
Photographing Lightning
Bataflae Photo Backpack
The Guide to Tropical Nature Photography
Essential Gear for Safaris
Take our Digital Nature Photo Course FIRST!
GPS and Home Security
Range IR Camera Remote
Gitzo Monopod 5561T Monopod
Easy Macro with Extension Tubes and Zoom Lenses
FotoSharp Camou Rain Covers
Canon 17mm T/S Lens
Locking Button for the Canon 7D
NIK HDR Program
Silver Efex Pro for Black and White Images
Beware the DELL Software Solution Rip Off
How and What We Pack for Trips
Canon Digital Learning Center
The Movie Mode with the Canon Mark IV
Batch Renaming in Bridge and CS5
Alternate Uses of some Bogen Products
Hoodman Products
Using High ISO and Live View for Focusing in Dim Light
Art Print Scams for Hungry Photographers
Hungry Vultures ruin vehicles in the Everglades
Use a Short Lens for Depth of Field
Get Professional Help!
Mini-Molar Bag
Access America Trip Insurance
Bogen Base for Macro Work
Archived Tips of the Month
prior to July 2009
Most of my original Tips of the Month for the last several
years are available through this link. Warning - some of the links are broken, so some are not available at this time. Also, the 'look' is from my
original web site, although if I ever have enough time I might redo these pages to match the new web site But that's not a high priority.
Check out our latest website,
mcdonaldwildlifephotos.com
where we'll be adding portfolios and eventually building up
a searchable data base for photo buyers. We've just started,
and the selection is limited, but it is still worth a visit!
Office Phone: (717) 543-6423
Or FAX us at: (717) 543-5342